Taking Close Up Photographs
Photographs need to be sharp and clear if they are to show details. It is much more difficult to take sharp and clear photographs close up than from a distance, and I often receive inquiries where the photographs are not clear. This can be easily avoided, which saves everyone time!
The most common problem is that the subject is out of focus. An image that is in focus is sharp and clear and shows all the details of the subject. An image that is out of focus is blurred and fuzzy. A photograph that is in focus can be enlarged to see more detail. A photograph that is out of focus is useless.
Other common problems are that the light level is too low, so that the depth of field doesn't cover the full depth of the subject and slow shutter speed allows camera shake to blur the image, or that the image is too small (too few pixels) to show sufficient detail.
You can easily overcome these problems by taking note of these simple points.
Steadying a Camera: Click image to enlarge
- Make sure that the subject is in focus: As you bring the camera closer to an object, there is a point where the lens can no longer make an image that is in sharp focus. Don't get closer to the subject than your camera can focus! Don't try to fill the frame with the subject; a clear sharp image can be enlarged but an image that is out of focus is useless.
- Take photographs in daylight: Natural daylight is the best light; artificial light of any sort is pretty well useless for close up photographs. You can't rely on your eyes to tell you this because they adjust to lighting conditions. Use natural daylight, but avoid harsh direct sunlight. A window ledge is perfect.
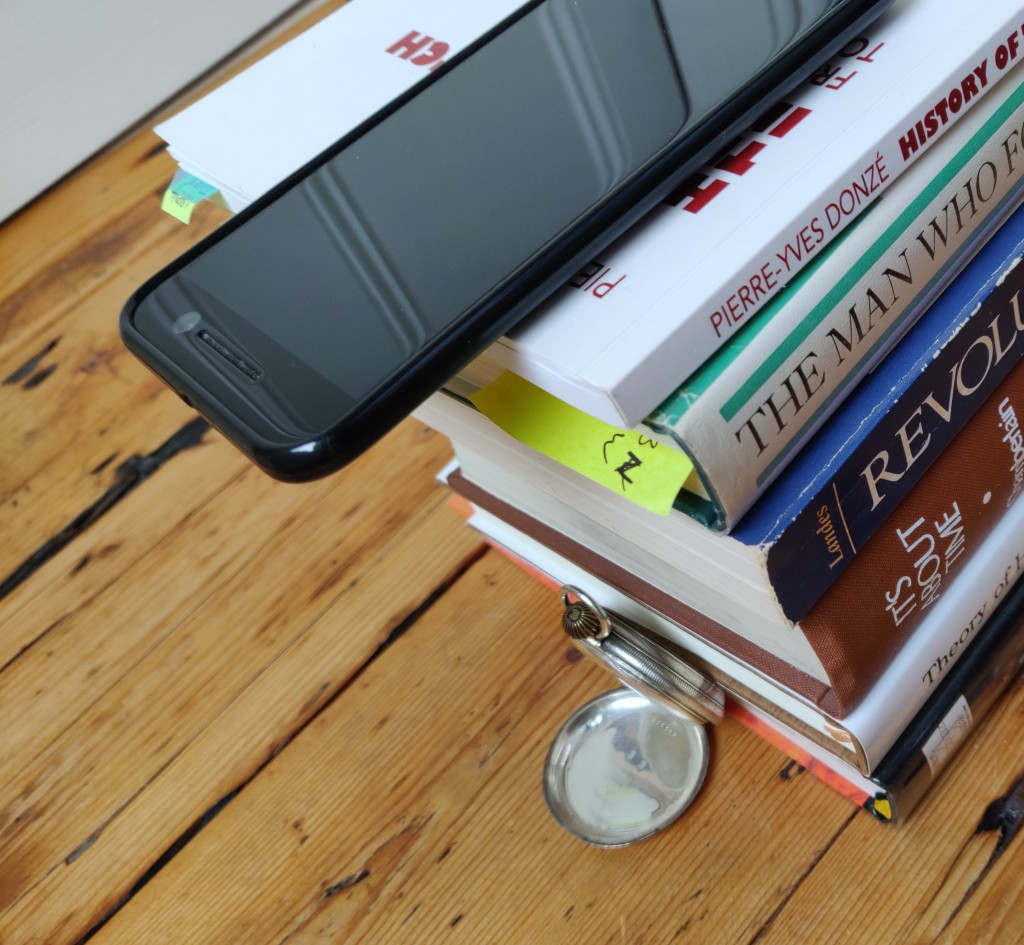
- Keep the camera very steady: If the camera moves at all while the photograph is being taken, the picture will be blurred. It is impossible to hold the camera sufficiently steady in your hands for close up photographs, it must be rested on, or braced against, something. In the photo, a phone is rested on a stack of books; it's not pretty, but it is very effective. Using a shutter delay is also a good idea, so that you are not touching the camera when it takes the shot.
- Use enough pixels: Digital photographs need to be at least 1,000 pixels, and preferably 2,000 pixels, across to show adequate detail. All digital cameras, including smart phones and tablets, are capable of this today. Please check this before sending photographs; if they are less than 1,000 pixels across they are a waste of time. Sometimes devices, particularly Apple, silently reduce the size of images before sending them; try to make sure this doesn't happen.
If you remember these points you will be able to take great close up photographs, even with a very basic camera, tablet or smartphone.
The most important points to remember are to use daylight and make sure the image is in focus.
Daylight is by far the best light, most artificial light is very poor in comparison, and desk lamps are terrible. Plenty of good light allows your camera to “stop down”, which means it reduces the aperture of the lens. This makes the region front to back that is sharp, called the depth of field, greater.
Don't just rely on your camera to get the focus right. When it is very close to the subject, it might fasten on somewhere other than where you really want it to focus, and with depth of field being very shallow a distance of a few millimetres in front or behind can make all the difference.
More Detailed Guidance
Cameras are generally designed for taking photographs of people and scenes, they are not naturally good at taking close ups. You need to bear this in mind; good close up photographs are more difficult to take than everyday photographs of people and landscapes.

macro symbol
The most important thing to remember is to use really good light, which means daylight, not artificial light.
Check to see what the minimum focussing distance is for your camera, and whether it has a "macro" mode for taking close up photographs, often indicated by the symbol of a flower shown here. Don't try to take photographs closer to your subject than the minimum focussing distance for your camera. A picture that is out of focus it is no use to anyone.
Don't worry if the subject doesn't fill the frame. If the picture has a good number of pixels, which even a smartphone or tablet does these days, and the subject is in focus, then it can be zoomed to examine detail, and cropped if necessary. If the detail isn't there and in sharp focus, zooming in can't produce any more information.
If you want to crop a picture so that you have just the part you need, an excellent and free program for Microsoft Windows is Irfanview. To crop an image, you use the mouse left click and drag to outline the area you want, press Ctrl-Y to crop, and then Ctrl-S to save the cropped image, and you're done!
The Right Light is Vital!
Make sure that there is plenty of light, and remember that you can't rely on your eyes to tell you this. I can't emphasise this point enough!
Most Artificial light, such as normal room lighting or a table lamp, is virtually useless for taking close ups; it just isn't bright enough to make a good photograph, no matter how bright it looks to you. Daylight is much better.
Professional photographers use light sources of hundreds or thousands of watts to light their subjects, and they know that lighting for close ups is especially difficult. Using a 60 watt desk lamp or similar is a complete waste of time. Daylight is thousands of times brighter than almost any artificial light, but you most likely didn't know that until you read this, because your eyes adapt.
The range of sensitivity of the human eye is much greater than any camera ever made. Your eyes adapt automatically to the ambient light level, and they have an enormous range. In addition, what you think you see is not only the information that is coming in through your retina, your brain uses what the eyes tell it and what it knows about a scene to build up the picture that you ‘see’. In dim light your eyes and brain work together so that the light seems to be quite adequate to show the scene, but a camera can't do this, it can only work with the light that is actually coming through the lens. In dim conditions the camera simply doesn't have enough light take a decent photograph.
Bright light is needed when taking close ups to make sure that as much as possible of the subject is in focus. In dim light or artificial light the camera opens up the aperture in its lens to let in more light, but at some point the aperture becomes fully open; after that the shutter speed is reduced so that the exposure takes longer, which again lets in more light. The problems with this are;
- the depth of field, the range of distance over which items are in focus, is very shallow, especially when you are close to the subject
- the slow shutter speed means you will shake the camera during the exposure if you are holding it in your hands.
- lenses do not perform at their best at full aperture
An ideal exposure would be something like 1/125 second at f11, that would freeze hand shake and give a reasonable depth of focus. To achieve this use daylight, either out doors or using a well lit part of a room near to a window, a window cill is ideal.
Daylight is much brighter than artificial light, but because of the way that your eyes and brain work together to hide this you won't be able to tell unless you use an exposure meter.

IWC Calibres 63 and 64. Click image to enlarge.
Flash illumination is very good at providing extra light and freezing action, but it often doesn't work well at close distances. If you do want to use flash, fit a diffuser and try to use the flash off the camera. Bouncing the flash off a white card onto the subject also helps.
Avoid Blurring the Picture
To make sure that the picture is not blurred by camera movement, support the camera so that it can't move during the exposure. A tripod is ideal, but a stack of books or magazines that you can rest your elbows on will work nearly as well. Try to make sure that the camera doesn't move during the exposure, squeeze the shutter release gently and confirm that the camera is focussed on the object, and then squeeze the shutter release gently to take the shot without jarring the camera. Even better if you are using a tripod is to use the camera's self timer to release the shutter.
Photographing Watch Movements
It is a convention that watch movements are photographed with the pendant or winding stem at the top as shown here. This is the way movements are pictured in all the reference books, so using the same orientation makes identification much easier.
Light
Illuminance is a measure of how much light is spread over a given area. Light output from a source, with the power at each wavelength weighted according to human visual brightness perception, is measured in lumens. The output is divided by the area that it is illuminating to give the brightness in lux. One lux is defined as an intensity of one lumen per square metre. For photography of objects to show their details, a brightness of 1,000 lux is about the minimum. If the area that you are illuminating (not the object itself) is about one metre square, a light source providing 1,000 lumens at the surface is required.
Digital Camera Sensors
The size of the sensor that captures the light is obviously important. The bigger the sensor, the more light it can capture. However, the measurements used for sensor sizes date back to the age when vacuum tubes were used in video cameras and the size designation is nothing like as simple as the diagonal measurement of the sensor. Instead, it's the outer diameter measurement of a tube where the usable image, i.e. the sensor, takes up two thirds of the circle. Which is a pretty useless measurement.
The following table compares the approximate sizes of some popular sensor formats.
| Designation | Size (mm) | Area (mm2) | Diagonal | Scale |
|---|---|---|---|---|
| Full Frame 35mm | 36 × 24 | 864 | 43.3 | 1 |
| APS-C | 23.6 × 15.7 | 370 | 28.3 | 2.34 |
| APS-C (Canon) | 22.2 × 14.8 | 329 | 26.7 | 2.63 |
| Micro Four Thirds | 17.3 × 13.0 | 225 | 21.6 | 3.84 |
| 1" One Inch | 13.2 × 8.8 | 116 | 15.9 | 7.45 |
| 1/2.3" | 6.16 × 4.55 | 28 | 7.7 | 31 |
The 1/2.3" type sensor is used in many ‘super zoom’ cameras because it is relatively easy to make a zoom lens with a large range to cover a smaller sensor, but their performance in low light is limited by the light gathering power of the small sensor area. The 1" one inch sensor is now a good choice for travel cameras with good zoom ranges and low light capabilities.
The difference between a Micro Four Thirds (MFT or M4/3) sensor and an APS-C digital sensor is not as great as some people make out. The Canon APS-C sensor is smaller than most and is only 46% greater in area than an M4/3 sensor. Other APS-C sensors are bigger than the Canon at 64% greater in area than an M4/3 sensor. But these differences are really trivial and, all other things being equal, would not be noticeable in the real world, and perhaps not even detectable using special tests. A full frame sensor is nearly four times (3.84× or +284%) greater area than a M4/3 sensor, which might make a difference, but probably not a lot and the cameras are much bigger and heavier. The principal difference between a full frame sensor and an APS-C or M4/3 is its shallower depth of field.
Print Sizes
At one time a 12 MegaPixel (MP) sensor was considered large, and then 16 MP became the norm, and now digital camera makers are pushing higher and higher resolutions of 20 MP or more. So what size images can you make from one of these sensors?
High quality printing for magazines and exhibitions uses 300 dots per inch print density, so a ten inch square printed image would need 300 × 10 × 300 × 10 = 9,000,000 pixels or 9MP (assuming that dots and pixels are equivalent). Most images are not printed square and because of this sensors are made rectangular, with the ratio of their long to short sides being either 4:3 or 3:2. Full frame and derivative cameras such as APS-C use 3:2 whereas Micro Four Thirds cameras use 4:3. It has long been recognised that is rather wide for general photography, although it is better for landscape work. A 4:3 ratio is better for most photography, and uses a greater proportion of the area of the round image projected by the lens.
Taking some typical sensors, what print size could they make at 300 dots per inch?
| Size and Aspect Ratio | Resolution (pixels) | Print Size (inches) |
|---|---|---|
| 12.0 MP, 4:3 | 4,000 × 3,000 | 13.3 × 10.0 |
| 16.0 MP, 4:3 | 4,592 × 3,448 | 15.3 × 11.5 |
| 20.2 MP, 4:3 | 5,184 × 3,888 | 17.3 × 13.0 |
| 24.3 MP, 3:2 | 6,048 × 4,024 | 20.2 × 13.4 |
The biggest image ever printed in the Horological Journal is the full page image that appears on the back cover, which is approximately 11" × 7¾", so any of the sensors listed above could produce an image that could be printed at full resolution on the back of the HJ.
Display Size
If you are going to view images on a computer display or television, remember that standard 1080p High Definition is 1920 × 1080 pixels, which is 2.1 MP. An Ultra High Definition or UHD display, sometimes called a 4K display, is 3840 × 2160 pixels or 8.3 MP. So pretty well any camera or smartphone can produce an image that will display at full size on a standard HD display. A camera with a 16 MP sensor will produce an image that is displayed full screen at 50% resolution on an UHD display.
Film vs. Digital
The resolution of 35mm film is huge compared to any digital sensor yet produced, but the problem is that turning it into a digital image requires the film to be scanned, and the resolution of the scanner limits what detail can be recovered from the film. Photographer Tom Dempsey remarks ‘for my publishing needs, APS-C-size sensor improvements easily surpassed my scanning of 35mm film by 2009.’
Macro Depth of Field
When taking very close up or macros shots, the depth of field can be very shallow. This handy calculator from photopills.com works it out and suggests step sizes for focus stacking.
If you have any comments or questions, please don't hesitate to get in touch via my Contact Me page.
Copyright © David Boettcher 2005 - 2026 all rights reserved. This page updated January 2024.
Back to the top of the page.